Installing Galileo Print Manager.net
This topic provides a user-interactive installation procedure for Galileo Print Manager.net. Travelport also provides a Galileo Print Manager.net installation process that requires no user interaction, referred to as a "silent install". For details, see Silent Installation.
Galileo Print Manager.net Installation Package
The “GPM.NET.exe” file is the installation package for the Galileo Print Manager.net application. It is contained in a compressed (.zip) folder. Download the most current version of the compressed Galileo Print Manager.net installation package from the Travelport Support Website provided by your Travelport representative.
Microsoft .NET Framework
Galileo Print Manager.net is a 32/64-bit Windows application that requires Microsoft .NET Framework 4.8 as a prerequisite. The GPM.NET installation process automatically installs Microsoft .NET Framework 4.8 if it is not currently installed on the computer that hosts GPM.NET.
You can download .NET Framework 4.8 from the following locations:
Note: If the Galileo Print Manager.net installation process does not install the .NET Framework successfully, download and install Microsoft .NET Framework 4.8 from the support page provided by your Travelport representative.
Installation Steps
IMPORTANT: To run the installation process, you must be logged on as a user with administrative privileges.
- To begin the installation process, double-click the compressed (.zip) folder that you obtained from Travelport.
- Extract the GPM.NET.exe file.
-
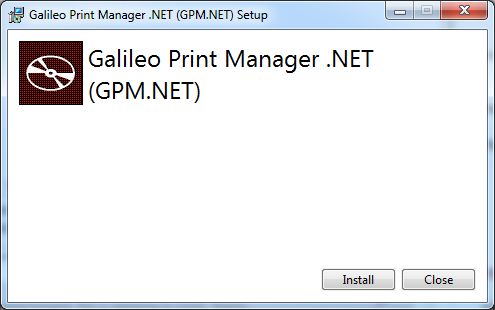
Double-click the extracted GPM.NET.exe file.
The Galileo Print Manager .NET (GPM.NET) Setup dialog box appears:
-
Click Install.
The installation process checks whether Microsoft .NET Framework 4.8 is installed on the computer.
-
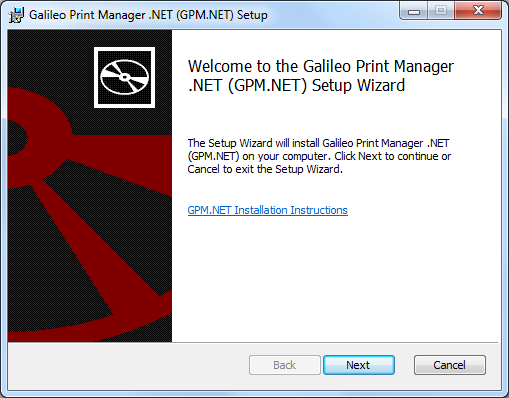
If installed already, the Welcome dialog box for the GPM.NET Setup Wizard appears:
Continue to step 5.
-
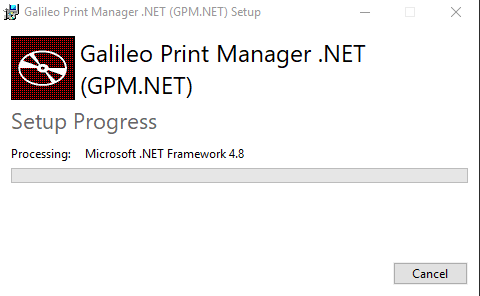
If not installed, the Galileo Print Manager.net installation process automatically installs Microsoft .NET Framework 4.8. The Setup Progress dialog box shows the progress:
After the Microsoft .NET Framework 4.8 installation process finishes, a screen similar to the following appears:
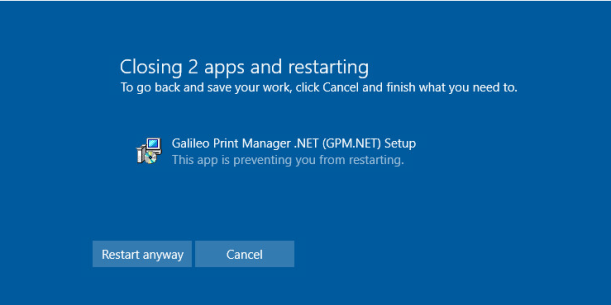
Choose one of the following actions. (IMPORTANT: A timeout requires you to make this decision within 30 seconds. If the timeout expires, the Welcome dialog box for the GPM.NET Setup Wizard appears, as shown in step 5. Continue with step 5. You will be required to restart the computer later in step 14.)
-
Click Restart anyway to restart your computer now. Installing Microsoft .NET Framework 4.8 requires you to restart the computer, now or later on.
After the computer restarts, the Galileo Print Manager .NET (GPM.NET) Setup dialog box appears again, as shown in step 3. Return to step 4 to continue the Galileo Print Manager.net installation process.
- Click Cancel to not restart and continue to step 5 of the Galileo Print Manager.net installation process. (If you choose to not restart now, you will need to restart the computer at the end of the Galileo Print Manager.net installation process, as explained in step 14.)
-
-
-
In the Welcome dialog box, click Next.
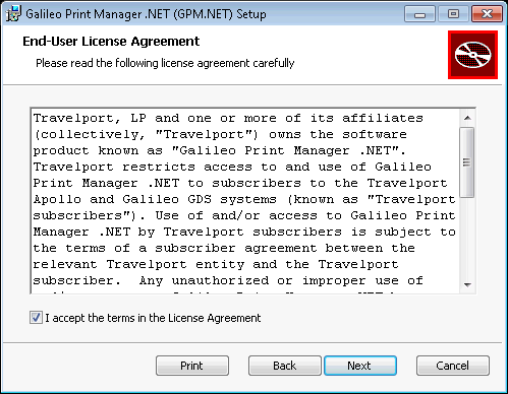
The End-User License Agreement dialog box appears:
-
After reading the license agreement, select I accept the terms in the License Agreement, and then click Next.
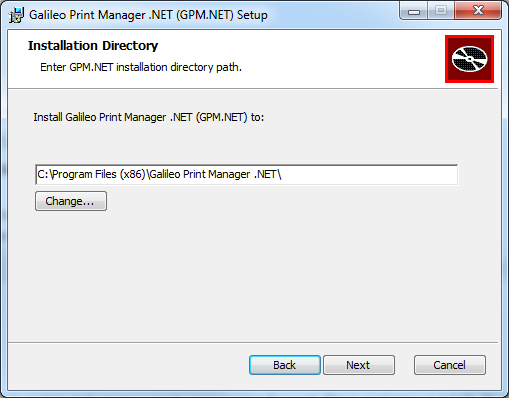
The Installation Directory dialog box appears:
-
On this dialog box, you can accept the default installation directory path, as shown in the text box, or you can change the location by clicking Change. When you are ready to proceed, click Next.
The Service account dialog box appears:
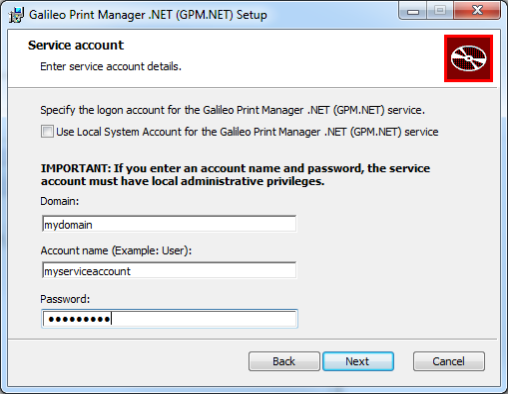
- Specify the logon account for the GPM.NET service:
Because Galileo Print Manager.net runs as a Windows service, the Service account dialog box appears so that you can specify the Windows account that the service will use. You can change this setting later by using the Windows Services administrative tool.
IMPORTANT: The account that you specify for the GPM.NET service must have administrative privileges. This is essential for Galileo Print Manager.net to automatically start and function when you boot, reboot, or restart your computer. For this reason, Travelport recommends that you set up a user account with administrative privileges that is dedicated to Galileo Print Manager.net use.
If you will send documents to a networked printer, choose an account that has access to that device. In many cases, the Local System account will NOT be able to access networked devices on a domain.
Choose either the Local System Account or a Network Account (to connect to a networked device on the domain):
For Local System Account, select Use Local System Account for the Galileo Print Manager .NET (GPM.NET) service. A warning displays: No default windows printers may be specified in the configuration.
For Network Account, type the name of the domain in the Domain field, the name of the appropriate account (with Admin privileges) in the Account name field, and the account password in the Password field.
For Network Printers, see Configuring Network Printer Permissions for more details.
For Workgroup Printers, see Printing to a Network Printer in a Workgroup Environment for more details.
-
After specifying the logon account, click Next.
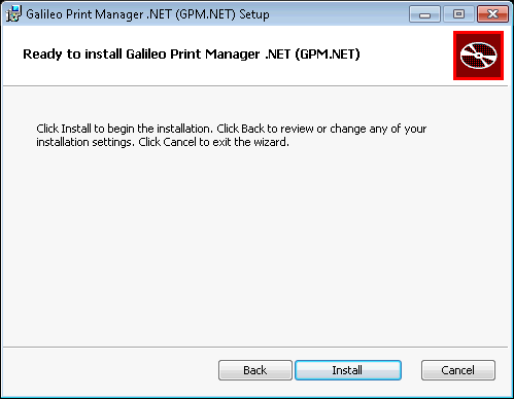
The Ready to install Galileo Print Manager .NET (GPM.NET) dialog box appears:
-
Click Install.
The Installing Galileo Print Manager .NET (GPM.NET) dialog box appears:
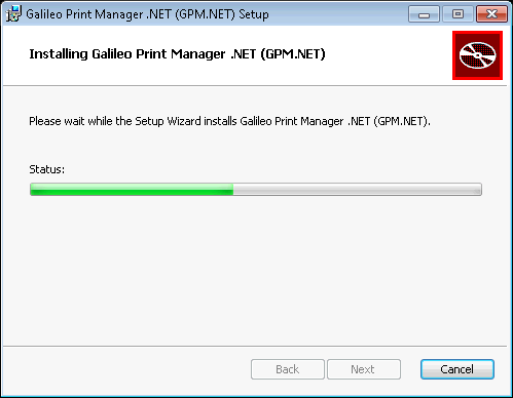
This dialog box shows the status of the installation process.
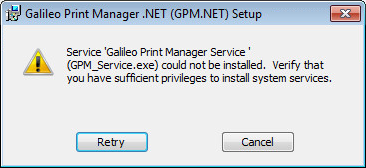
Note: The installation process requires that you log on as a user with administrative privileges AND specify an account with administrative privileges on the Service account dialog box. If you are not logged on as a user with administrative privileges, the following error message appears:
If you receive this error, cancel the installation process, log on as a user with administrative privileges, and then restart the installation process.
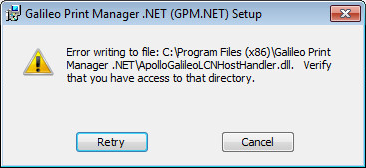
If you are logged on as a user with administrative privileges, but the account that you specified on the Service account dialog box does not have administrative privileges, the following error message appears:
If you receive this error, cancel the installation process, restart it, specify an account with administrative privileges on the Service account dialog box when it appears, and then continue with the installation process, as described below.
If a previous installation of Galileo Print Manager.net is currently running, the Files in Use dialog box appears:
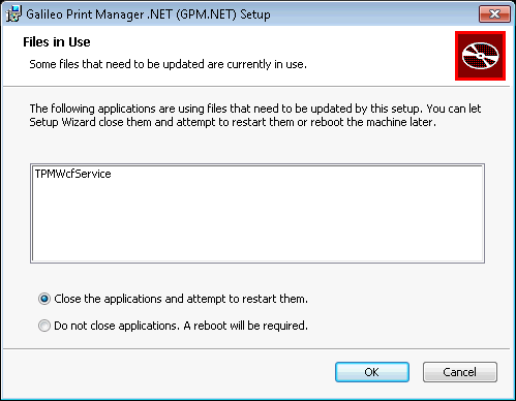
-
If this dialog box appears, select the option that is best for your situation, and then click OK.
The following dialog box appears:
The installation process added the following items to your computer's program menu:
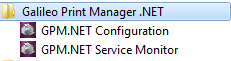
- GPM.NET Configuration: Opens the GPM.NET Configuration window, which enables you to configure or reconfigure Galileo Print Manager.net settings at any time. Any changes that you make will not take effect until the GPM.NET service is restarted or the machine is rebooted. For more information, see Configuring Galileo Print Manager.net.
-
GPM.NET Service Monitor: Starts the GPM.NET service and places the Galileo Print Manager.net icon (
 ) in the Windows notification area (located on the right side of the Windows taskbar). You can use the GPM.NET Service Monitor to open the GPM.NET Status window or restart the GPM.NET service. For more information, see Running Galileo Print Manager.net. Note: The GPM.NET service automatically starts when you boot, reboot, or restart your machine. Use this program menu option if the service has stopped and the icon is not displayed in the notification area.
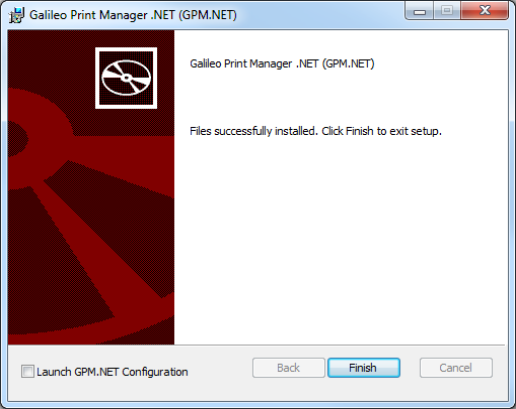
- If you want to configure Galileo Print Manager.net immediately after exiting setup, select Launch GPM.NET Configuration.
-
Click Finish.
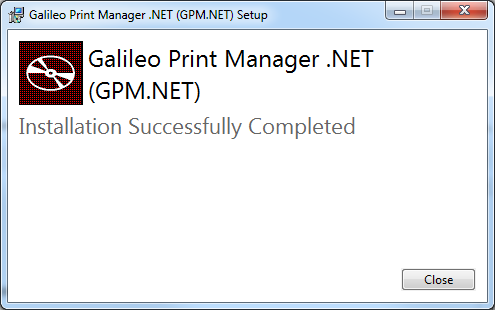
The Installation Successfully Completed dialog box appears:
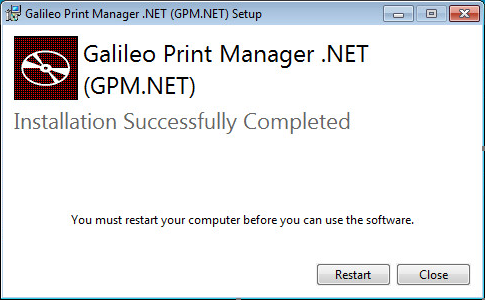
Note: If the Galileo Print Manager.net installation process automatically installed Microsoft .NET Framework 4.8, but you decided not to restart the computer as explained in step 4, the following dialog box appears instead:
-
Click Close.
Note: If the Galileo Print Manager.net installation process automatically installed Microsoft .NET Framework 4.8, you must restart the computer before using Galileo Print Manager.net. To restart the computer from the dialog box shown above, click Restart rather than Close.